During winter, heating consumes a large part of my energy bill. I installed a Nest Thermostat before winter, and whilst I like the product as a device, I wanted to evaluate the performance on a more empirical basis (i.e. looking past the product and marketing to evaluate the product performance based on data). This blog post covers the questions I asked myself and how it led me to build a very simple but effective home IOT sensor setup to answer some of those questions.
Full disclosure: I work for Google who produces the Nest Thermostat. I purchased it from the Google store without any employee discount at full price and installed it myself to my hot water boiler.
My learnings from optimising the heating in my apartment
- Commoditisation and maturity of IOT platforms and ecosystem make building your own set of IOT sensors in 2021 a trivial activity with anyone with an IT / engineering background. The M5Stack set of products are especially impressive and this is no longer the domain of specialists nor experts.
- In 2021, assuming that you have well defined integration standards and code libraries, if you are not prototyping IOT sensors in minutes (not days), you’re doing something wrong.
- My Nest Thermostat works better now I know how to empirically measure and adjust for the individual heating requirements of each room in my apartment.
- The intelligent / learning capabilities of the Nest Thermostat (and other so called intelligent thermostats) are overstated and over marketed. An empirical IOT sensor approach (or time-series measurement based approach) will make any thermostat based heating solution much more efficient and comfortable.
After installation of the Nest Thermostat, I asked myself the following questions:
- Question 1: How does the Nest decide to turn on the heating?
- Question 2: What impact does the Nest heating have on the temperature in my apartment (by room)?
- Question 3: What changes can I make to optimise the heating and/or heat retention of my apartment?
Question 1 troubles me because one product design principle of Nest was to keep the thermostat simple. The product marketing says the following: “Because it learns from you. It gets to know the temperature that you like when you’re at home. And turns itself down when you’re away. It even learns how your home warms up or how draughty it is, so it only uses the energy it needs.” In the application there is very little information or explanation as to why it does what it does — so this could be the truth or complete marketing bulldust.
This led me to Question 2: what kind of data was Google collecting to make these intelligent decisions? What was Google doing with my data and how was Nest making those decisions? The obvious solution was to implement an independent audit of the Nest Thermostat with a set of IOT sensors that I would build to obtain time series data of temperature and humidity in multiple key locations of the apartment.
By answering Question 2, I believe I could then answer Question 3.
The IOT solution to measure the performance of my apartment’s heating
- IOT Platform Modules: My IOT platform is composed of various modules based on ESP32 and ESP8266 chipset from Espressif Systems. I have a mix of M5Stack (M5Atom and M5Stick) and a generic NodeMCU ESP8266.
- IOT Sensors: I’ve used primarily M5Stack environment sensors (BMP280, SHT30, and others), as well as an old Sparkfun BMP085 I had lying around. All of these sensors are I2C based.
- IOT Server: An old Raspberry PI 1 (I found in a recycling bin!), running Raspberry PI OS Lite, Mosquitto MQTT server.
- Sensor UI and Data Processing: Node-Red + Node-RedUI Server, an incredible low-code platform that is open source and works well.
My approach was inspired heavily by this blog post and other material from the authors and manufacturers. The key setup steps are below.
- Wiring up the sensors: Using Grove connectors for I2C and jumper cables for the older BMP085 module. Find the product documentation pages and example code for the next step.
- Coding the sensors: Coded in Arduino IDE using the PubSubClient and standard ESP32 and ESP8266 Wifi libraries. Refactor the example code to obtain sensor readings and publish to your MQTT server (refer to above blog post)
- Installing the Node-Red and MQTT server: Refer to Node-Red documentation and use their installation script.
- Integration testing: Update MQTT subscription topics and output metrics on Node-Red.
And that’s pretty much it. The community documentation on the above is incredibly useful and shows how mature the ecosystem is now. After a day or so, I got the following:
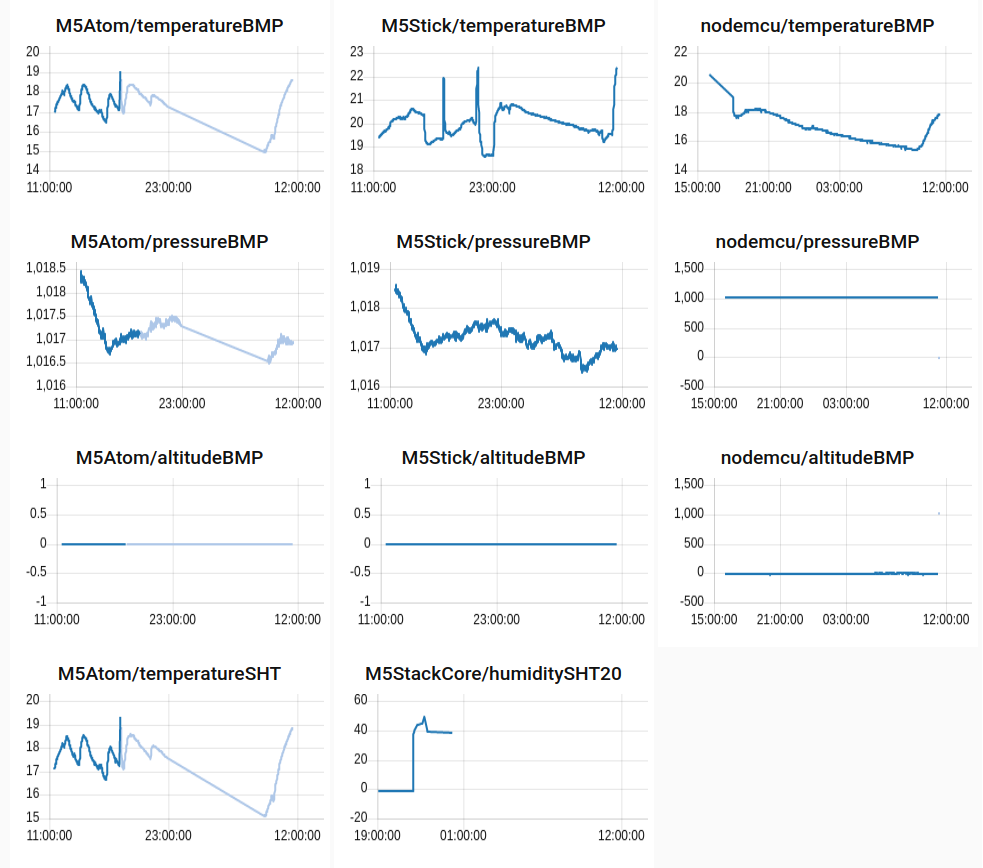
Key findings
- Distribution of heat across the apartment was uneven. This gave me crucial information to adjust radiator settings to ensure each room has the right temperature
- Time-series gives insight into heat-loss and heat-gain: This is not in the Nest Thermostat application and is very revealing.
- Rooms lose heat and gain heat at different rates. In my case, I need to work out how to insulate my M5Atom room and increase heat delivery into M5Stick room.
- On a 0C day, I spend an incredible amount of my heating energy in the morning to bring my house from night temperature (15C) to comfort temperature (18.5C), approximately 2.5 hours. From thermostat trigger (17C) to comfort temperature (18.5C) it takes approximately 30 minutes. I have hot water radiator system in my apartment and this seems pretty reasonable given the inherent heat inertia of the system.
- From my data, the Nest Thermostat is triggered like any other thermostat at low temperature.
- The Nest Thermostat single thermostat approach heavily biases heating by the location of the device.
- In this case, M5Stick is in the same position as the Nest Thermostat, and you can see it never drops below 18.5 C (the setting of the Nest). However, other parts of my apartment are well below this (15C in M5Atom or 15.4C in nodemcu’s rooms).
- This empirical observation confirms my belief that a single thermostat solution is insufficient to achieve consistent and comfortable heating across a multi-room apartment.
- I have not observed any automatic intervention by my Nest Thermostat to anticipate lower temperature in other rooms (based on learning my own manual interventions), i.e. intelligence.
- Be wary of variation in sensor accuracy: Do not blindly trust sensors (including the sensor in the Nest). Having multiple sensors from multiple providers is the only way you can check data being reported. In my case, my BMP085 is not providing accurate barometric pressure. This doesn’t matter to me, but may indicate a bug in my code, the library code or a faulty sensor.
Finally, I did investigate a cloud based approach such as this community tutorial from Google Cloud, but the infrastructure provided from Code-Red and Mosquitto was easier to deploy. The time to insight from the above approach was much more productive when compared to building a similar dashboard on the Cloud. I suspect this would be the same with any other cloud provider, hence I decided on an on-prem based solution here.